Easy Fire Drawing: Simple Steps To Ignite Your Art
Have you ever looked at a flickering flame and wished you could capture that amazing glow on paper? It’s a common thought, that, and many people feel a bit unsure where to begin with something that seems so alive. You might think drawing fire needs some kind of magic touch, but honestly, it’s a lot like whipping up a delicious treat. You don't have to be a pro baker to make a delicious treat, right? The same goes for drawing something as dynamic as fire.
Just like you can satisfy your sweet tooth with these easy dessert recipes from Food Network, you can satisfy your creative urge with simple drawing methods. These recipes, which include everything from ice cream to pie, will satisfy any sweet tooth — vegan or not! It’s all about breaking things down into manageable steps, you know, making it feel less like a big challenge and more like a fun activity.
This guide is here to show you how simple it can be to create a convincing fire drawing. We’ll go through the basic shapes and colors, making sure you feel good about putting pencil to paper. You’ll find that with a few straightforward ideas, you can really make your art pop, and it’s actually pretty fun, too, once you get going.
Table of Contents
- Why Learn Easy Fire Drawing?
- Getting Started: Your Basic Tools
- The Core Elements of Fire
- Easy Steps to Draw a Simple Flame
- Beyond the Basics: Making Your Fire Unique
- Common Pitfalls to Skip
- Practice Makes Perfect (and Fun!)
- Frequently Asked Questions (FAQs)
- Conclusion
Why Learn Easy Fire Drawing?
Learning to draw something like fire, even just a simple version, can be incredibly satisfying, you know? It's like when you get dinner on the table with Food Network's best recipes. There’s a real sense of accomplishment when you create something that looks so alive, and it’s a skill that actually opens up a lot of creative doors, too.
Sparking Your Creativity
Fire has a way of grabbing your attention, doesn't it? It’s constantly moving, changing, and putting it on paper means you get to play with all sorts of shapes and colors. This can really get your creative juices flowing, so it's a bit like finding those easy breakfast ideas that help you start your day with something delicious. It just feels good to make something new.
You’ll discover that drawing fire helps you see things a little differently. You start noticing how light behaves, how colors blend, and how to suggest movement with just a few lines. It’s a pretty cool way to train your eye, honestly, and it makes you more aware of the world around you.
A Skill for Many Projects
Think about it: fire shows up in so many places. You might want to draw a cozy fireplace scene, a dragon, or even just a small candle flame. Knowing how to do an easy fire drawing means you can add that spark to all sorts of pictures, more or less whenever you want. It’s a pretty versatile skill to have in your art toolkit.
Whether you’re cooking with seasonal produce from the local farmers market or planning to fire up the grill for an alfresco family dinner, these recipes are sure to make mealtime memorable. Similarly, adding fire to your drawings can make them really stand out and feel complete. It just adds a certain warmth or excitement, you know, to your creations.
Getting Started: Your Basic Tools
You don’t need a fancy art studio to start drawing fire. In fact, you can probably begin with things you already have lying around. It’s a bit like how some of the best meals come from just a few simple ingredients. You can turn a versatile grain into a savory side dish, a satisfying main, or even dessert by adding just a few other ingredients. These rice recipes from Food Network make it easy, and so does this approach to drawing.
What You'll Need
For an easy fire drawing, you just need a few basic items. A pencil, maybe an eraser, and some paper are really all you need to get the shape down. If you want to add color, some crayons, colored pencils, or even markers will do the trick. Don’t feel like you need anything expensive; the goal here is to make it simple and fun, you know, not complicated.
You might also want to have a few different shades of red, orange, and yellow. A little bit of black or dark brown can help with shading, too. But really, start with what’s available. The most important thing is just getting started, so, don't worry too much about having the perfect supplies.
The Core Elements of Fire
Breaking down fire into its basic parts makes it much less intimidating to draw. It’s like understanding the main components of a recipe before you start cooking. Once you know what makes fire look like fire, you can put those pieces together in your own way. This helps you build a strong foundation, you know, for your drawing.
The Flame Shape
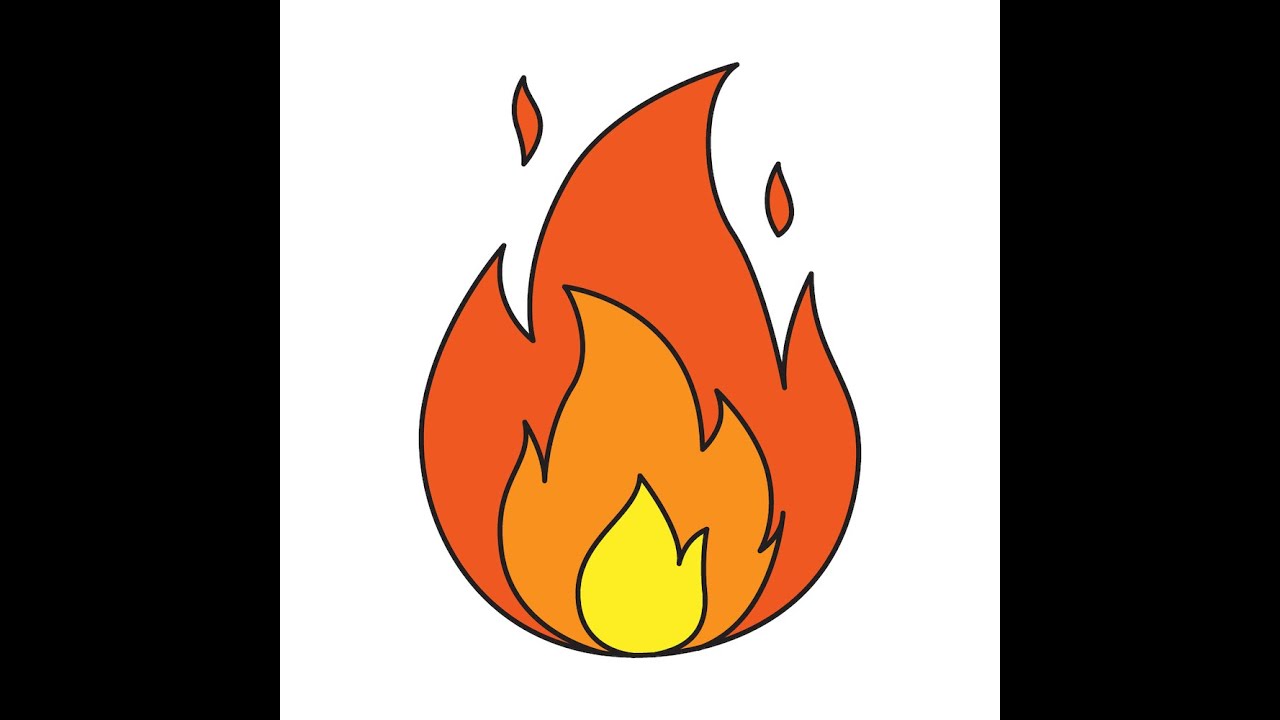
When you think of fire, what shape comes to mind? Probably something wavy, kind of like a teardrop or a dancing ribbon. That’s the basic flame shape. It’s wider at the bottom and gets narrower as it goes up, often with a pointed top. You can draw several of these shapes, overlapping them a bit, to create a more lively fire. It’s really just a series of gentle curves, in a way, that rise up.
Imagine a gentle, flickering movement. The shapes aren't stiff or straight; they have a soft, flowing quality. Drawing these simple, wavy forms is the first step to making your fire look believable. It's almost like drawing a very relaxed S-shape, but going upwards, you know, with a bit of a wobble.
Adding Movement
Fire is always moving, right? To show this in your drawing, you can use wavy lines that go upwards and twist a little. Think about how smoke curls or how a flag flutters in the wind. These kinds of lines give the impression of motion. You can also make some flames taller than others, or have them lean a bit to one side, which really adds to the sense of it being alive.
Don't make your lines too rigid. A little bit of unevenness actually makes the fire look more natural. Some lines can be short and quick, others longer and more flowing. This mix of line types helps create that dynamic look that fire naturally has, so, it feels less like a static drawing and more like something happening.
Playing with Color
The colors of fire are what really make it pop. You typically see bright yellows, oranges, and reds. The hottest parts of the flame, usually the center or near the bottom, are often the brightest yellow or even white. As you move outwards and upwards, the colors shift to orange, then red, and sometimes even a dark, smoky brown or black at the very edges or where it meets fuel. This layering of colors is pretty key.
Think about how light works. The brightest colors go in the middle, and then you blend outwards to the darker ones. You can use your colored pencils or crayons to layer these shades. Start with yellow, then gently add orange over parts of it, and then red on the outside. This blending helps create a smooth transition, and it’s actually a very satisfying process, you know, watching the colors come together.
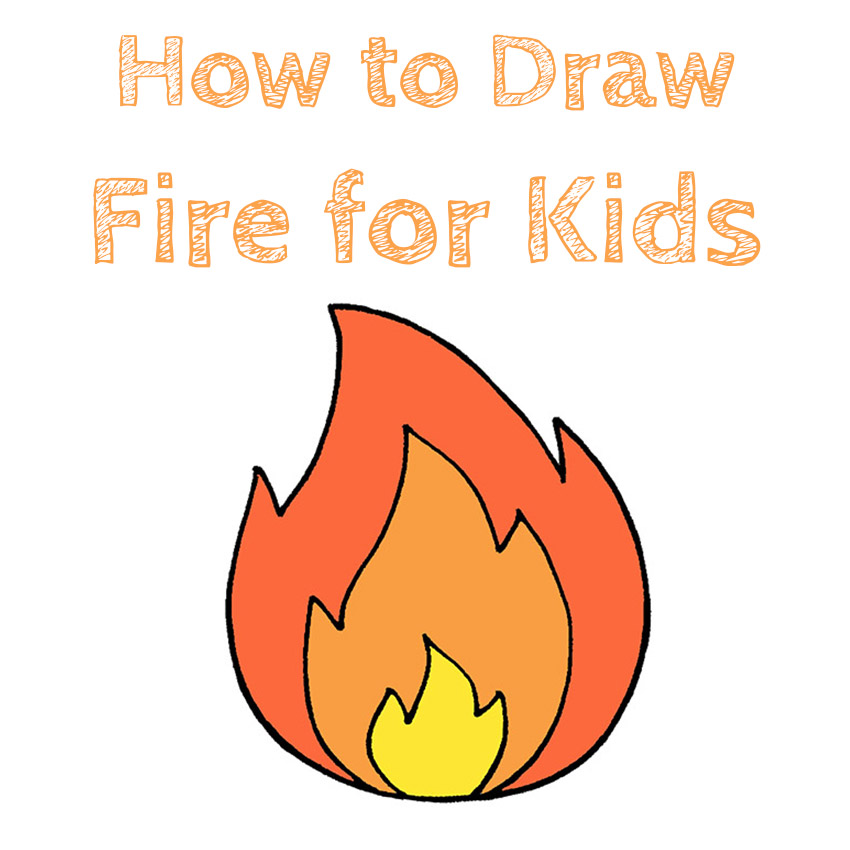
Easy Steps to Draw a Simple Flame
Now, let's put these ideas into practice with a step-by-step approach. This is where it gets really simple, almost like following a recipe. Just take it one step at a time, and you’ll be surprised at what you can create. We're going to build this fire drawing from the ground up, you know, just like you'd build a tasty meal.
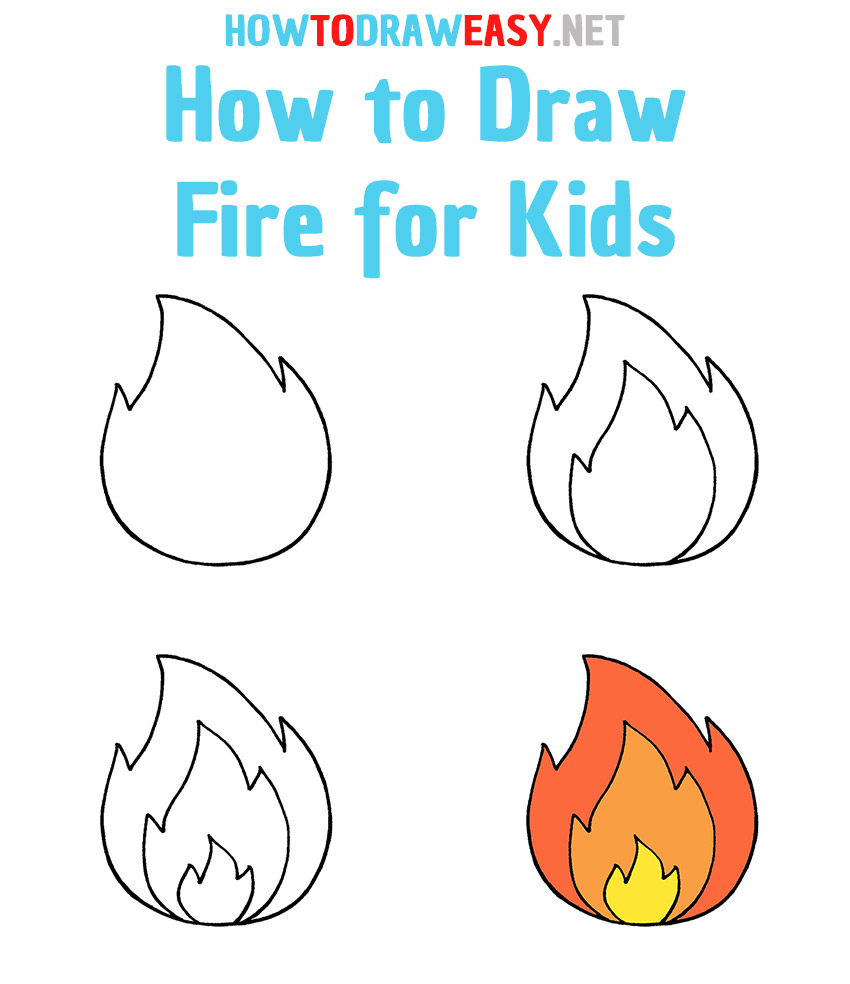
Step 1: The Base Shape
Start by drawing a basic, irregular teardrop shape. This will be your main flame. Don't worry about making it perfect; fire is naturally messy. You can make it a bit wobbly on the sides. This shape should be wider at the bottom and come to a point at the top. Think of it as the core of your fire, the part that holds everything else together, more or less.
You might want to draw a few of these, slightly overlapping, to suggest a cluster of flames. Keep your lines light at this stage, so you can easily erase if you need to make changes. This is just the starting point, you know, the rough sketch that guides your hand.
Step 2: Adding Wavy Lines
Inside your main flame shape, draw a few smaller, wavier shapes that follow the same upward path. These will be the inner parts of the flame, showing where the fire is hottest. They should be a bit narrower and might seem to dance around inside the main outline. Think of them as smaller flames trying to reach up, you know, like little tongues of fire.
You can also add some lines that curl outwards from the main flame, suggesting smoke or heat rising. These lines should be light and flowing, not stiff. This really helps give your fire a sense of movement and makes it look more alive. It’s all about those gentle, curving motions, actually.
Step 3: Layering Colors
Now for the fun part: color! Start with your brightest yellow. Fill in the innermost flame shapes and the very bottom center of your main flame. This is where the fire is most intense. Don't press too hard, just a nice, even layer of yellow. This color will be the foundation for your flame's brightness, you know, like the base of a good sauce.
Next, take your orange. Color around the yellow areas, blending it slightly into the yellow. As you move outwards, press a little harder with the orange, making it a bit darker. Then, use your red to color the outermost parts of the flame, blending it into the orange. You want a smooth transition from yellow to orange to red, so it looks natural, more or less like a real flame.
You can even add a touch of very light white or cream in the absolute brightest center of the yellow, if you have it. This makes the flame seem incredibly hot. Remember, the key is to layer the colors gently, building up the intensity. It’s a bit like adding just a few other ingredients to turn a versatile grain into something special, you know, each color adds something.
Step 4: Shading for Depth
To make your fire drawing really pop, add some subtle shading. Use a darker red or even a touch of brown or black around the very edges of your flame, especially where it might meet whatever is burning. This creates a bit of contrast and makes the bright colors seem even brighter. It gives the fire a more three-dimensional feel, you know, a bit of body.
You can also add a hint of dark color underneath the fire, suggesting a shadow or the charred remains of wood. This grounds your fire and makes it feel like it’s actually sitting on something. Just a little bit of dark can make a big difference in how real your fire looks, so, don't skip this part if you want it to truly stand out.
Beyond the Basics: Making Your Fire Unique
Once you’ve got the hang of drawing a basic flame, you can start playing around with different types of fire. Just like you can adjust a recipe to your liking, you can tweak your fire drawing to fit different scenes. It’s all about having fun with it and seeing what you can create, you know, making it your own.
Campfire Glow
For a campfire, you’ll want to draw a few larger, more irregular flames. Add some logs or sticks underneath, and maybe some smoke curling upwards. The light from a campfire often casts a warm glow on its surroundings, so you can suggest this by adding a soft, orange light around the base of your fire. It creates a really cozy feeling, more or less, like a real campfire.
Think about the embers, too. You can draw small, glowing red or orange dots among the logs to show the heat radiating from the wood. This adds a lot of realism to your campfire scene. It’s those little details that really bring a drawing to life, you know, making it feel complete.
Candle Flickers
A candle flame is usually smaller and more contained. It often has a very bright, almost white, center, with a clear yellow and orange outer glow. You can draw a thin wick coming up from a wax candle shape. The flame itself might be a single, gentle teardrop shape, perhaps leaning slightly to one side to show a gentle breeze. It’s a bit more delicate than a big bonfire, you know, a very subtle kind of fire.
The light from a candle is softer, too. You might want to use lighter colors and blend them very smoothly. This creates a peaceful, gentle effect, really different from the wildness of a big fire. It's a nice way to practice drawing different intensities of light, actually, and how that changes the feel of the fire.
Dragon's Breath
If you’re feeling a bit more adventurous, try drawing dragon’s breath! This fire is often more intense, perhaps with sharper, more jagged edges, and a lot of smoke. You might use darker reds and even some purples or blacks in the smoke to make it look really powerful. The flames could be larger and more aggressive, shooting out in different directions. It’s a very dramatic kind of fire, you know, full of energy.
You can also add sparks flying off the main flames to show extreme heat. This kind of fire drawing lets you really push the boundaries of shape and color, making it look truly fantastical. It’s a great way to experiment with how fire can express different emotions or ideas in your art, so, have fun with it!
Common Pitfalls to Skip
Sometimes, when you’re starting out, you might run into a few common issues. Don't worry, everyone does! It’s like when you’re trying a new recipe and something doesn’t quite turn out as planned. The key is to learn from it and adjust. For example, some people draw flames too stiffly, making them look like rigid triangles. Remember, fire moves, so keep those lines wavy and flowing. That’s a pretty common thing, you know, to make things too perfect.
Another thing to watch out for is using just one color. Fire isn’t just red or just orange; it’s a mix of many colors blending together. Make sure you layer your yellows, oranges, and reds to get that realistic glow. Also, don't forget to add a bit of darkness around the edges or underneath to give it depth. Without that contrast, the fire might look a bit flat, so, remember to use a range of tones.
Practice Makes Perfect (and Fun!)
Just like anything new, the more you practice drawing fire, the better you’ll get. You don’t have to create a masterpiece every time. Just try drawing a few flames each day, playing with different shapes and colors. You’ll start to develop your own style and find what works best for you. It’s a very rewarding process, you know, seeing your skills grow.
You could even look at pictures of real fire or watch videos to see how it moves and changes. This helps you get a better feel for its natural flow. Remember, the goal is to have fun and enjoy the process of creating something. It’s not about being perfect; it’s about the joy of making art, so, keep at it!
Frequently Asked Questions (FAQs)
How do you draw simple fire?
To draw simple fire, start with a basic teardrop or wavy shape that’s wider at the bottom and pointy at the top. Inside this shape, draw smaller, wavier lines to show the inner flame. Then, use yellow for the brightest center, blending outwards to orange and then red. Add a bit of darker color around the edges for depth. It's really just a few easy steps, you know, to get the basic look down.
What colors do you use to draw fire?
The main colors for drawing fire are yellow, orange, and red. You typically put the brightest yellow in the very center or hottest parts, then layer orange around it, and finally use red for the outer edges of the flame. Sometimes, a touch of white can go in the brightest spot, and a bit of dark brown or black can be used for shading or smoke. It's a bit like mixing paint, you know, to get the right blend.
Is it hard to draw fire?
Drawing fire might seem hard at first because it’s always moving, but it’s actually quite simple when you break it down. By focusing on basic wavy shapes, layering colors, and adding a bit of movement with your lines, anyone can create a convincing fire drawing. It's really not as tough as it looks, you know, once you know the simple tricks.
Conclusion
So, there you have it! Learning to do an easy fire drawing is totally within reach, honestly. It’s a lot like finding those healthy meatless dishes or easy options that’ll satisfy you — and your whole family. It just takes a few simple steps and a willingness to play with shapes and colors. You can really bring a dynamic element to your drawings with these ideas, and it’s a skill that just keeps giving.
Remember, whether you’re cooking with seasonal produce from the local farmers market or planning to fire up the grill for an alfresco family dinner, these recipes are sure to make mealtime special. Similarly, these drawing tips are here to make your art time special, too. Keep practicing, keep experimenting, and most importantly, keep having fun with your art. Learn more about drawing techniques on our site, and you can also link to this page
Detail Author 👤:
- Name : Dr. Devan Blanda
- Username : schneider.lonnie
- Email : qschuppe@yahoo.com
- Birthdate : 1977-05-12
- Address : 7290 Goyette Island Apt. 227 Kirlinland, TX 74602
- Phone : +1-434-988-4304
- Company : Halvorson-Shanahan
- Job : Tire Changer
- Bio : Non sit in est. Nam voluptatibus quasi iusto rerum ut totam similique. Voluptatem facere quia autem sed molestiae rerum. Voluptatibus tempora non voluptatem vitae.
Socials 🌐
facebook:
- url : https://facebook.com/archibaldmraz
- username : archibaldmraz
- bio : Aliquam molestias voluptatem harum nihil tempora quasi.
- followers : 1639
- following : 1501
linkedin:
- url : https://linkedin.com/in/archibald_mraz
- username : archibald_mraz
- bio : Magnam enim sint enim aut debitis aut.
- followers : 4369
- following : 2352
twitter:
- url : https://twitter.com/archibald_mraz
- username : archibald_mraz
- bio : Tempore asperiores esse nihil. Eos beatae fuga dolor doloremque qui. Aut fuga dicta ut odio. Quas odio sit omnis similique consequatur et est.
- followers : 2282
- following : 2221
tiktok:
- url : https://tiktok.com/@archibald.mraz
- username : archibald.mraz
- bio : Molestias ratione dolores reiciendis qui delectus omnis delectus.
- followers : 6393
- following : 868
