How Draw A Star: Your Simple Guide To Sparkling Creations Today
Learning how draw a star can feel like a truly magical thing to do. It opens up so many ways to add a little sparkle to your art. Whether you are just starting out with making pictures or you have been doing it for a while, getting a star to look just right is a fun skill to pick up. You can use stars in so many different kinds of projects, you know, from greeting cards to big digital pieces.
People often wonder about the best way to make these shapes appear on paper or on a screen. There are a few different approaches you can take, and some are, like, very simple indeed. We will go through some easy steps to help you get a nice star shape down. It is all about finding what feels good for you.
We are going to explore how you can make a star that really stands out. We will also look at some cool tools, including a free online drawing application that helps you create digital artwork to share online and export to popular image formats like JPEG, PNG, SVG, and PDF. So, let us get ready to make some shining art.
- Lauren Alexis Twerking
- What Does Purple And Blue Make
- Emily Jean Whiteford
- How To Lace Dunks
- What Does Igu Mean
Table of Contents
- Why Learn How to Draw a Star?
- Getting Ready to Draw Your Star
- The Classic Five-Point Star: Step by Step
- Drawing a Star in One Go (The Single Stroke Way)
- Making Your Star Shine with Digital Tools
- Tips for Drawing Stars of All Kinds
- What if I want to draw a 3D star?
- Frequently Asked Questions About Drawing Stars
Why Learn How to Draw a Star?
Learning how draw a star is a pretty cool thing for anyone who enjoys making art. Stars show up everywhere, you know, in cartoons, on flags, and in all sorts of designs. Being able to make one yourself means you can add that special touch to your own creations.
It is also a good way to practice your hand movements and get better at drawing shapes. You can use these skills for other things you might want to draw later. It is, like, a fundamental shape to get down.
For those who like digital art, drawing a star can be a starting point for more complex designs. You can easily draw, edit photos, or design your next business card using tools that allow you to craft images for social media posts, digital ads, paper, or even apparel. So, it has many uses, that is for sure.
- Snl Im 50
- Daves Hot Chicken Mac And Cheese
- Burn Movie Chair Scene
- Sadie Mckenna Cum Tribute
- Ynw Melly Mugshot
Getting Ready to Draw Your Star
Before you even put a mark down, it is good to get everything set up. This means picking out what you will draw with and where you will make your art. This part is, you know, pretty important for a smooth start.
Tools You Might Use
If you are drawing on paper, you will just need a pencil and some paper. Maybe an eraser too, just in case you want to fix something. That is, like, the simplest setup.
For digital drawing, you have many more choices. There is a free online drawing application for all ages that lets you create digital artwork. It is a really handy tool to use. You can paint online with natural brushes, layers, and edit your drawings there. It is, you know, quite versatile.
Some people might use a tablet and a stylus, while others might just use their computer mouse. Any of these ways can work just fine for making a star. You just pick what feels good to you, you know, what you have available.
Setting Up Your Digital Space
If you are using that free online drawing application, you will want to open it up in your web browser. You can start a new canvas there. This gives you a clean space to work on your star. It is, like, your blank slate.
You can pick a brush that feels good for outlining your star. The application lets you use a variety of tools such as brushes, textures, and effects to bring your artistic ideas to life. You can also import, save, and upload images, which is, you know, pretty useful.
Remember that you can always change the color or the size of your drawing tool. This gives you, you know, lots of control over how your star will look. It is all about making it your own.
The Classic Five-Point Star: Step by Step
This is probably the most common way people learn how draw a star. It makes a shape that looks, you know, very familiar to most people. We will go through it one step at a time.
Starting with the Basics
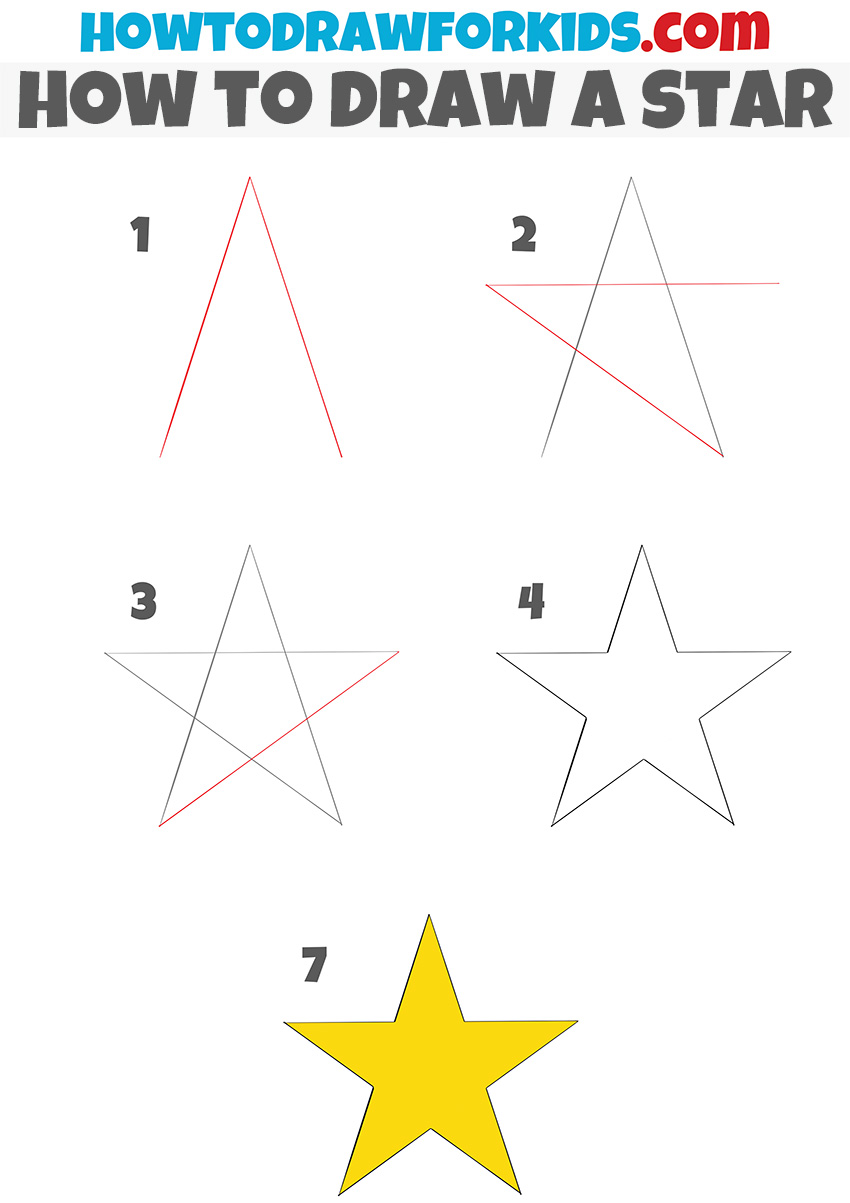
First, you might want to draw a small dot in the middle of your drawing area. This will be, like, a guide for where your star will sit. It helps you keep things even.
Next, draw a circle around that dot. You do not have to make it perfect, just a light circle. This circle will help you place the five points of your star. It is, you know, a sort of framework.
Now, imagine dividing that circle into five equal parts. You can put five dots on the circle's edge, evenly spaced out. These will be the points of your star. It is, you know, a little bit like a clock face with five numbers.
Connecting the Points
This is where the star shape really begins to appear. You will connect the dots, but not in order. Instead, you will skip one dot each time. So, if you start at the top dot, you would draw a line to the third dot around the circle.
Then, from that third dot, you draw a line to the fifth dot. From the fifth dot, you draw a line to the second dot. Keep going like this until you connect back to your starting point. It is, you know, a bit like a puzzle.
You should now have a five-pointed star shape. It might look a little messy at first, but that is perfectly fine. You can clean it up later. This process is, you know, quite satisfying when it works out.
Making It Look Just Right
Once you have the basic outline, you can go over the lines you want to keep. Make them a little darker or thicker. You can use a different color too, if you want. This helps the star really pop out. That is, you know, a nice touch.
Then, you can erase any extra lines you drew, like the initial circle or the dots. This makes your star look much cleaner and more finished. It is, like, giving it a polished look.
If you are using a digital tool, you can use layers to help with this. You could draw your guide lines on one layer and then draw the actual star on a new layer above it. This makes erasing super easy. It is, you know, a really good feature.
Drawing a Star in One Go (The Single Stroke Way)
Many people ask how draw a star without lifting your pen. This is a neat trick, and it makes a different kind of star, often called a pentagram. It is, you know, a bit more flowing.
Start at one point, say the top. Draw a line going down and to the right, past the middle. Then, without lifting your pen, draw a line going up and to the right, making a point.
From that point, draw a line straight across to the left. Then, draw a line going down and to the left, making another point. Finally, draw a line going up and to the right, connecting back to where you started. It is, you know, a continuous path.
This method creates a star that looks like it was made with one continuous movement. It is a fun way to practice your line control. You can try this on paper or with your digital drawing tool. It is, like, a cool party trick too.
Making Your Star Shine with Digital Tools
The free online drawing application we talked about earlier offers so many ways to make your star truly sparkle. It is not just about drawing the outline. You can add lots of details and effects. This is where, you know, the fun really starts.
Using Brushes and Textures
Once you have your star shape, you can fill it in with color. The application lets you paint online with natural brushes. You can pick a solid color or even use a textured brush to give your star a unique look. It is, like, adding personality.
You can also draw the letter “s” to take a shortcut to the style chooser. This makes it super easy to try out different looks for your star. You can experiment with various textures to make your star look rough, smooth, or even glittery. That is, you know, pretty handy.
While holding the button, you can tap the screen with different finger combinations to access tool presets that have been set up in the tool. This means you can quickly switch between different brush types or sizes. It is, you know, all about making things easy for you.
Adding Color and Effects
Beyond just filling in your star, you can add shading to make it look like it has depth. Use a slightly darker shade of your chosen color along one side of each point. This creates, you know, a bit of a three-dimensional feel.
The application also allows you to edit your drawings. You can add effects like glows around your star to make it look like it is truly shining. Think about putting a lighter color or even white around the edges. It is, like, making it pop off the screen.
You can also use the drag and drop feature for quick photo edits, which might not be for drawing a star itself, but it shows how versatile the tool is for other art projects. It is, you know, a very flexible system.
Sharing Your Starry Art
Once your star is complete and looks just how you want it, you can share it with others. The free online drawing application lets you create digital artwork to share online. This means your friends and family can see what you made. That is, you know, a great part of creating.
You can also export your artwork to popular image formats like JPEG, PNG, SVG, and PDF. This is really useful if you want to print your star or use it in other programs. You can craft images for social media posts, digital ads, paper, or even apparel. It is, like, so many possibilities.
The ability to export in different formats means your star can live in many places. You could even use it to design your next business card, if you wanted. It is, you know, pretty cool how much you can do.
Tips for Drawing Stars of All Kinds
Once you get comfortable with how draw a star, you can start to play around with different styles and shapes. There is no one way to make a star, after all. It is, you know, all about your own creative touch.
Thinking About Symmetry
A star often looks best when its points are somewhat even. You can try to make your lines and angles similar on all sides. This gives your star a balanced look. It is, like, a harmonious appearance.
If you are drawing digitally, some applications might have tools that help with symmetry. While the mentioned free online drawing application focuses on freehand and tool presets, other tools like Autodraw pair machine learning with drawings from talented artists to help you draw stuff fast, sometimes suggesting symmetrical shapes. This can be, you know, a real help.
Even if you are drawing freehand, just trying to make each point look similar to the others will make a big difference. Practice helps a lot with this. You will get better with each star you make. That is, you know, how skills grow.
Practicing Different Shapes
Stars do not always have to have five points. You can try drawing stars with four points, six points, or even more. Each number of points creates a different kind of star. It is, you know, a fun way to explore.
You can also change how long or short the points are. Some stars have very pointy tips, while others might have broader, more rounded ones. This changes the whole feel of the star. It is, like, giving it a different personality.
Remember that you can always go back and adjust things. The free online drawing application allows you to edit your drawings, so you are not stuck with your first attempt. This means you can keep refining your star until it is just right. You can Learn more about creating digital art on our site, and discover more drawing tips here.
What if I want to draw a 3D star?
Drawing a star that looks like it has depth, like a 3D object, is a bit more involved. It means adding lines that show the sides of the star's points, making it look solid instead of flat. This is, you know, a step up in complexity.
You would typically start with your basic 2D star. Then, from each inner corner of the star, you would draw a line going slightly down and to the side. Connect these lines to create the illusion of thickness. It is, like, adding another layer to your drawing.
You can also add shading to these new surfaces to really make the star look three-dimensional. This involves picking a light source and then coloring the surfaces that would be in shadow a bit darker. This is, you know, how artists make things pop.
Frequently Asked Questions About Drawing Stars
People often have questions when they are learning how draw a star. Here are some common ones that come up, you know, pretty often.
How do you draw a star without lifting your pen?
You can draw a five-pointed star in one continuous line by starting at one point, drawing to a non-adjacent point, then continuing to another non-adjacent point, and so on, until you return to your start. It forms, you know, a kind of zigzag path.
What is the easiest way to draw a star?
The easiest way for many is to draw a small circle, then place five evenly spaced dots around its edge. Then, you connect these dots by skipping one each time, going from point to point until the star shape appears. This is, you know, a very straightforward method.
How do you draw a star with a compass?
Using a compass helps you create a very precise star. You draw a circle with the compass, then divide the circle into five equal parts using a protractor or by carefully measuring. Mark these five points, and then connect them in the same skipping pattern as the easiest method. It gives you, you know, a really neat result.

Detail Author 👤:
- Name : Dusty Blanda II
- Username : janae.altenwerth
- Email : adrianna.oberbrunner@yahoo.com
- Birthdate : 1975-07-15
- Address : 40487 Kendrick Burgs Apt. 655 Lake Kyleigh, IA 10737-0939
- Phone : 680-555-2904
- Company : Gislason-Hintz
- Job : Bindery Worker
- Bio : Natus dicta nobis dolores et laborum non. Est omnis qui quas a expedita. Molestias atque quos ut. Voluptates aliquam laboriosam eligendi ullam aut quae.
Socials 🌐
facebook:
- url : https://facebook.com/cora_official
- username : cora_official
- bio : Ipsam voluptatem animi recusandae aut.
- followers : 3880
- following : 1462
instagram:
- url : https://instagram.com/creminc
- username : creminc
- bio : Quod enim qui quod harum et ea ea beatae. Autem ducimus cupiditate excepturi fuga veritatis a.
- followers : 838
- following : 484
tiktok:
- url : https://tiktok.com/@creminc
- username : creminc
- bio : Consequuntur est voluptas quaerat quia culpa. Reiciendis cumque dolores velit.
- followers : 3308
- following : 2683
