Mastering The Cursive Z: A Simple Guide For Beautiful Handwriting
Learning how to write z in cursive can feel like a bit of a challenge, perhaps even a puzzle to solve for many people who are just starting out with this elegant style of writing. It's a letter that doesn't quite follow the usual patterns we might expect from its printed counterpart, and that, is that, can make it seem a little tricky at first glance. But, you know, getting a handle on this particular letter is absolutely possible, and it opens up a whole new world of neat, connected script.
If you've been looking for clear, straightforward guidance on how to make your cursive 'z' look just right, then, you know, you've certainly come to a good spot. We're going to go through everything you need to know, from the sweeping motions of the capital 'Z' to the distinctive loops of the lowercase version. It's really about breaking it down into smaller, easier steps, and with a little practice, you'll see your handwriting skills truly blossom.
Many folks find the cursive 'z' to be one of the more difficult cursive letters to learn, and that's actually quite common. This is partly because it isn’t intuitively written from the print version, and also, it has some unique curves that require a bit of finesse. But don't worry, we'll walk you through the process, and you'll find that with the right approach, it's really not so bad, in a way.
- They Know Me As The Rizzler Lyrics
- Jalen Hurts Shirtless
- Its Not A Phase Mom Dress To Impress
- Furry Nails Meaning
- Hasan Piker Lpsg
Table of Contents
- Why the Cursive Z Is a Bit Tricky
- How to Write the Lowercase Cursive Z
- How to Write the Uppercase Cursive Z (Cursive Capital Z)
- Practice Makes Perfect: Tips for Mastering the Cursive Z
- Frequently Asked Questions About Cursive Z
Why the Cursive Z Is a Bit Tricky
As we mentioned, the cursive "z" is actually one of the most difficult cursive letters to learn, and that's, you know, a pretty common observation. This is partly because it isn’t intuitively written from the print version, which means your hand has to learn a completely new set of motions. Unlike some other letters that just add a little flourish to their print form, the 'z' in cursive takes on a really different shape, so it's not just a small adjustment.
The cursive 'z' also involves some rather specific loops and turns that aren't found in many other letters. For instance, the lowercase 'z' often has a loop below the line, and the uppercase 'Z' uses sweeping curves and loops that can feel a bit complex at first. These unique characteristics mean it takes a bit more deliberate practice to get the flow just right, and that's perfectly normal, in a way.
Learning this letter, therefore, requires a slight shift in how you approach cursive writing. It's less about adapting what you already know and more about building a new motor skill for this specific character. But, you know, with the right guidance and some patience, anyone can master it, and it's quite satisfying when you do, really.
- Brazil Footballer Hulk
- Is Molly Noblitt In Jail
- Liquido Para Parabrisas
- Tik Tok Followers
- Sadie Mckenna Cum Tribute
How to Write the Lowercase Cursive Z
Writing a lowercase cursive “z” can seem a little intimidating, but breaking it down into smaller steps makes it much more manageable. This is a letter that tends to be one of the trickier ones, so don't get discouraged if it takes a few tries. We'll go through each part of the motion, and you'll see how it all comes together, more or less.
Starting the Lowercase Z
To begin the lowercase cursive 'z', you typically start just below the midline, or sometimes, just a little above the baseline, depending on the specific style you're learning. You make a small, gentle curve upwards, almost like the beginning of a lowercase 'r' or 's', but it's really just a short, soft stroke. This initial curve is quite important for setting up the rest of the letter, you know, giving it a good foundation.
From that initial upward curve, you then move your pen slightly to the right and begin to form a small, almost horizontal loop. This loop sits above the baseline, and it's not too big, just enough to create a distinct shape. Think of it as a tiny, graceful twist before the main part of the letter begins. It's a very subtle motion, but quite key to the overall appearance.
After completing that small upper loop, your pen will then come back down towards the baseline, forming a straight or slightly curved diagonal line. This line should pass through the baseline, extending downwards. It's quite a swift motion, and it helps to give the letter its characteristic slant, so, you know, keep that in mind as you practice.
Forming the Middle Loop and Descent
Once your pen has crossed the baseline and gone a bit below it, you then start to create the main loop of the lowercase 'z'. This is where the letter really takes its unique shape, and it's perhaps the most recognizable part. You'll curve your line to the left, forming a gentle, rounded loop that dips below the writing line. This loop should be fairly open, not too tight, which allows the letter to flow nicely, as a matter of fact.
After completing that leftward curve and loop, your pen will then sweep back up and to the right, crossing over the initial diagonal line you made. This crossing point is usually just below the baseline, or sometimes, right on it. It’s a very fluid motion that connects the lower loop back to the main body of the letter, and it needs to be smooth, you know, for a neat look.
The line then continues upwards, creating a small, almost straight line that ascends back towards the midline. This ascending stroke is what prepares the letter for connecting to the next character. It's a subtle but important part of the letter's structure, making it ready to join with other letters in a word, and it’s actually quite satisfying to get right.
The Final Tail and Connection
To finish the lowercase cursive 'z', after that upward stroke, your pen will then make a small, connecting tail that extends out to the right. This tail is typically a short, horizontal line, or perhaps, a very slightly upward-curving line. It's what allows the 'z' to link up seamlessly with the letter that follows it in a word, and it's quite an important detail for smooth cursive writing.
This connecting tail should be positioned at the height where the next letter would naturally begin, which is usually around the baseline or just above it. The idea is to create a continuous flow from one letter to the next, so the tail isn't just a decorative element; it's a functional part of the cursive system. It really helps with the overall readability of your writing, you know.
So, in essence, the lowercase 'z' involves a small upper loop, a diagonal descent, a larger lower loop, and then a connecting tail. It's a sequence of curves and lines that, with practice, becomes quite natural. Remember, you'll also find a free PDF worksheet for this, which can be super helpful for tracing and getting the feel of it, actually.
How to Write the Uppercase Cursive Z (Cursive Capital Z)
Writing the capital letter “Z” in cursive combines sweeping curves and loops, giving it a very elegant and distinctive appearance. It’s a bit more ornate than its lowercase counterpart, but by following the steps below, you can practice forming the letter easily and accurately. This letter, you know, really makes a statement in a word.
Beginning the Capital Z with a Sweep
To start the uppercase cursive 'Z', you usually begin with a graceful, upward sweeping curve from the baseline, or sometimes, just slightly above it. This initial stroke goes up towards the top line, or even a little above it, creating a gentle arc. It's a very flowing motion, setting the tone for the rest of the letter, and it should feel quite natural, more or less.
From the peak of that initial sweep, your pen then curves sharply downwards and to the left, forming the first part of the upper loop. This curve descends towards the middle of the letter, creating a rounded, almost teardrop shape at the top. It's a rather important part of the 'Z's' character, so, you know, try to make it smooth and consistent.
After that downward curve, you then bring your pen back up and to the right, crossing over your initial upward sweep. This creates the top loop of the 'Z', which often looks like a decorative flourish. This loop should be open and not too tight, allowing the eye to follow the line easily. It's a very visually appealing part of the letter, you know.
Creating the Upper Loop and Diagonal Stroke
Once you’ve completed the upper loop and your pen is positioned somewhere near the top line, you then begin the long, diagonal stroke that descends across the letter. This line goes from the upper right side down towards the lower left, crossing through the center of the letter. It's a very prominent part of the capital 'Z', giving it its strong structure, and it should be a fairly straight, deliberate line.
As you draw this diagonal line, make sure it has a consistent slant. This slant is quite important for the overall balance and appearance of the capital 'Z'. It's not too steep, nor too shallow, but just right to give the letter a sense of movement and grace. This is a really key stroke, so, you know, take your time with it.
This diagonal stroke will eventually reach a point near the baseline, or slightly below it, where you'll prepare to form the final, lower loop of the letter. It’s the bridge between the upper and lower sections, and its smoothness really contributes to the letter's overall elegance, as a matter of fact.
Finishing the Lower Loop and Exit Stroke
Upon reaching the end of the diagonal stroke, your pen will then curve sharply upwards and to the right, beginning the formation of the lower loop. This loop typically sits below the baseline and is often quite large and sweeping. It’s a very distinctive feature of the cursive capital 'Z', giving it a grand finish, and it should be rounded and open, you know.
As you complete this lower loop, your pen will then sweep back to the left and upwards, crossing over the diagonal stroke once more. This crossing point usually occurs near the middle of the letter, or sometimes, a little below it. This motion brings the letter to a graceful close, and it connects the lower loop back to the main body, making it feel complete, really.
Finally, after crossing the diagonal, your pen will continue with a small, gentle exit stroke that extends slightly to the right, ready to connect to the next letter if needed, or simply to finish the standalone 'Z'. This final flourish adds a touch of elegance and ensures the letter flows well. By following these steps, you can practice forming the letter easily and accurately, and you'll find it gets much smoother with time, pretty much.
Practice Makes Perfect: Tips for Mastering the Cursive Z
Learning how to write the cursive letter 'z' with ease truly comes down to consistent practice. It's not something you master in one sitting, but rather, a skill that improves with repetition and focused effort. There are several ways to approach your practice, and they all contribute to better handwriting skills, you know.
Using Worksheets and Animations
One of the best ways to get started is by using resources specifically designed for learning cursive. For instance, here's a quick animation we made of writing the cursive letter z in uppercase (aka cursive capital z) and lowercase. Watching these animations can really help you visualize the strokes before you even put pen to paper. It shows you the exact path the pen should take, which is very helpful, you know.
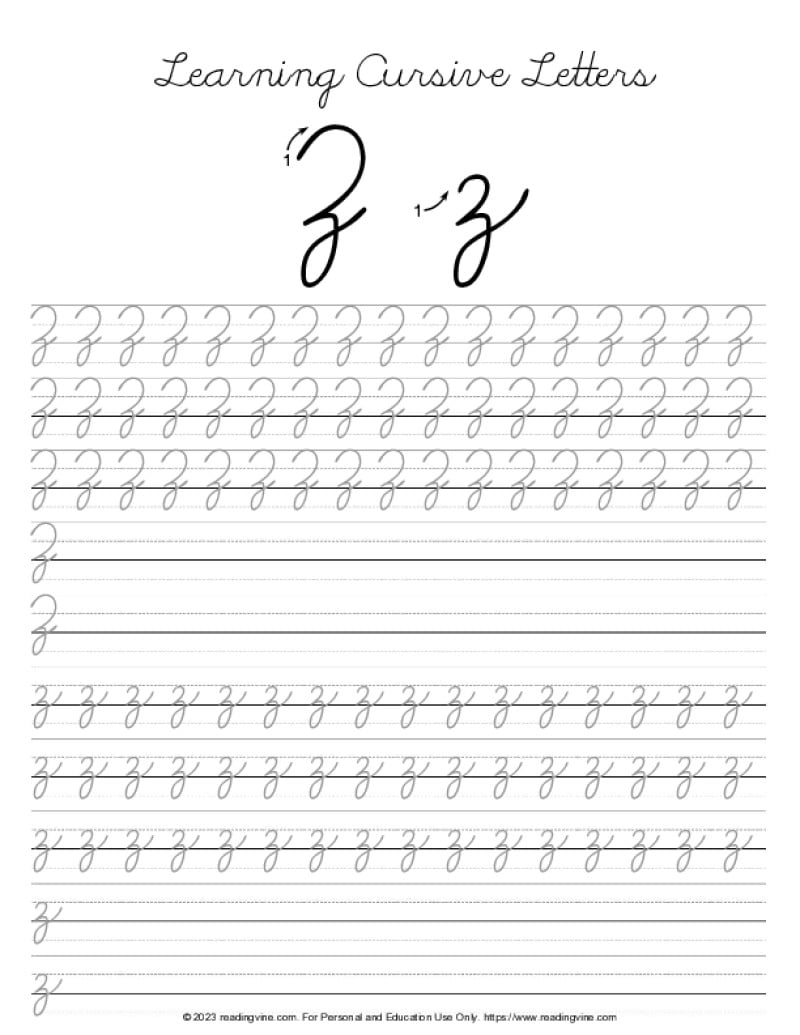
You'll also find a free PDF worksheet for this, which is an absolutely fantastic tool for hands-on practice. These worksheets often have tracing lines, allowing you to follow the correct formation of the letter multiple times. Tracing helps build muscle memory, so your hand gets used to the precise movements required for both the lowercase and uppercase 'z'. It's a really effective way to learn, actually.
Beyond tracing, these worksheets usually provide space for you to practice writing the letters independently. This step is quite important because it moves you from guided practice to doing it on your own. Download our free printable cursive z worksheet and master cursive alphabets step by step. It's a great way to see your progress, more or less.
Connecting the Z to Other Letters
Once you feel comfortable forming the individual 'z', both big and small, the next step is to practice connecting it to other letters. From tracing the shape to connecting it to other letters, you'll master the cursive 'z' in no time! This is a bit more challenging because it requires you to think about the flow between characters, and it's where the real magic of cursive happens, really.
Start with simple two-letter combinations, like "za" or "ez" or "zi". Pay attention to how the connecting strokes flow smoothly from the 'z' to the next letter, and vice versa. The goal is to avoid any abrupt stops or awkward gaps. This practice helps improve your overall handwriting skills with practice tips, and it makes your cursive look more natural and continuous, you know.
You can also try writing short words that include the 'z', such as "zebra" or "blizzard". This helps you see the 'z' in context and how it interacts with different letter shapes. It's a very practical way to refine your technique and build confidence in your cursive abilities, pretty much.
Consistent Practice for Better Handwriting
The key to truly mastering the cursive 'z' and indeed, all cursive letters, is regular, consistent practice. Even just a few minutes each day can make a significant difference over time. It's about building muscle memory and developing a fluid hand motion, which takes repetition. This is a video tutorial showing how to write the cursive letter z; both lowercase and uppercase are shown, and watching it often can help reinforce the movements, you know.
Don't be afraid to make mistakes; they are part of the learning process. Each time you practice, you're refining your movements and improving your control. Focus on making smooth, even strokes rather than rushing. This deliberate approach will yield much better results in the long run, and it's actually quite rewarding to see your handwriting improve.
Remember, welcome to our comprehensive post on the cursive writing alphabet. In this series, we’ll show you how to write both lowercase and uppercase letters in cursive and connect them. Consistent effort, along with using the right resources like video tutorials and worksheets, will help you learn how to write the cursive letter 'z' with ease, and you'll be writing beautifully in no time, so, you know, keep at it. You can learn more about cursive writing on our site, and find more practice materials on our dedicated practice page.
Frequently Asked Questions About Cursive Z
Is the cursive 'z' really hard to learn?
Many people find the cursive 'z' to be one of the more difficult cursive letters to learn, and that's actually quite a common observation. This is partly because it isn’t intuitively written from the print version, meaning its shape is very different from what you might expect. It also involves some unique loops and turns that aren't found in many other letters, so, you know, it takes a bit of extra practice to get it right, but it's totally doable.
Are there free worksheets available for practicing cursive 'z'?
Yes, absolutely! You'll often find free PDF worksheets available that are specifically designed for practicing the cursive 'z', both uppercase and lowercase. These worksheets typically include tracing exercises and blank lines for independent practice, which can be super helpful for building muscle memory and getting the feel of the letter. We offer a free printable cursive z worksheet to help you master it step by step, actually.
Can I watch a video to see how the cursive 'z' is written?
Yes, definitely! Video tutorials are a fantastic resource for learning how to write cursive letters, especially ones like the 'z' that have specific motions. There are many videos available that show you exactly how to write the cursive letter 'z', covering both lowercase and uppercase forms. Watching an animation or a video tutorial can really help you visualize the strokes and flow before you try it yourself, which is very useful, you know.
![How to Write Cursive Z [Worksheet + Tutorial]](https://mycursive.com/wp-content/uploads/2020/10/Z-1177x1536.png)
![How to Write Cursive Z [Worksheet + Tutorial]](https://mycursive.com/wp-content/uploads/2020/01/Z.jpg)
Detail Author 👤:
- Name : Dianna Kertzmann
- Username : keyshawn.hermiston
- Email : trice@gmail.com
- Birthdate : 2005-11-22
- Address : 2124 Medhurst Glen East Litzyshire, NM 74452-2435
- Phone : 1-283-780-1680
- Company : Rogahn and Sons
- Job : Gaming Manager
- Bio : Vero esse nihil vel et aut eos. Esse exercitationem aliquam ut optio omnis. Quod sit quisquam aut suscipit impedit sint mollitia.
Socials 🌐
linkedin:
- url : https://linkedin.com/in/vernice_paucek
- username : vernice_paucek
- bio : Et natus et qui ipsa eos et.
- followers : 636
- following : 326
instagram:
- url : https://instagram.com/vernice_paucek
- username : vernice_paucek
- bio : Consequatur error quibusdam ex beatae. Odio vero rerum est. Minus hic minima cumque nam.
- followers : 4849
- following : 2238
tiktok:
- url : https://tiktok.com/@vernicepaucek
- username : vernicepaucek
- bio : At sed similique minima asperiores aspernatur.
- followers : 5695
- following : 2014
