Dutch Braids Vs French Braids: Picking Your Perfect Plaited Look Today
Many people, you know, find themselves wondering about the differences between a Dutch braid and a French braid. These two braided styles, actually, look similar at first glance, but they have distinct techniques that create very different looks. It's almost like they are cousins in the world of hair, sharing a family name but having their own unique personalities.
Both Dutch and French braids are classic, stylish, and functional hairstyles that can be worn casually or dressed up for special occasions. They are, you know, very common braids preferred by girls and people of all ages. People often confuse the two, so it's a bit tricky to tell them apart sometimes.
This article will give you a clear idea about the main differences between these two lovely styles. We will also, you know, explore how to create each one, including those cute pigtail styles. Not sure which braid to choose, Dutch braids vs French braids? By the end, you will, hopefully, have a good idea of which one might be for you.
Table of Contents
- Understanding the Basics of Braids
- The Key Differences: Dutch Braids vs French Braids
- How to Create a French Braid
- How to Create a Dutch Braid
- Styling Your Braids: Tips and Ideas
- Choosing Your Braid: Which One Is For You?
- Frequently Asked Questions (FAQs)
- Conclusion
Understanding the Basics of Braids
Before we, you know, get into the specific differences, it's good to understand what these braids are all about. Both styles involve weaving sections of hair together, picking up more hair as you go. This is, in a way, what makes them "attached" braids, lying close to the head.
What is a French Braid?
A French braid is, you know, a classic style where the hair sections are crossed over each other. This creates a smooth, flat appearance that sits right against the scalp. It's a very elegant look, and it works well with a variety of hair lengths and types, so it's quite versatile.
French braids are typically laid flat against the scalp, creating a stylish and timeless look. This style is, in fact, often seen as a go-to for many. It's a rather neat and tidy braid, too, which is why it's so popular for everyday wear and more formal events.
What is a Dutch Braid?
The Dutch braid, sometimes called an "inside-out" braid, is where the hair sections are crossed underneath each other. This technique makes the braid stand out from the head, giving it a more raised and voluminous look. It's, you know, a very striking style that really pops.
Dutch braids provide a more voluminous appearance, which many people really like. It's, you know, a style that adds a lot of texture and dimension to your hair. This makes it a popular choice for those wanting a bolder braided statement, so it's often picked for that reason.
The Key Differences: Dutch Braids vs French Braids
Despite having many similarities, there are a few notable differences between a Dutch braid and a French braid. People often confuse the two, but once you know the core distinctions, it's actually quite easy to tell them apart. It's all in the technique, and once you learn it, there's a host of easy styles you can try.
The Braiding Technique
The main difference, you know, lies in how the hair sections are crossed. This is the core distinction between the two braids. It's a small change in movement that makes a big visual impact, so it's pretty important to get this right.
For a French braid, you, like, cross the hair strands over the middle section. You take a side piece and bring it over the center, then the other side piece over the new center. This "over" motion is what creates that flat, integrated look, so it's a key step.
However, for a Dutch braid, you, you know, cross the hair strands underneath the middle section. You take a side piece and bring it under the center, then the other side piece under the new center. This "under" motion is what pushes the braid out, making it appear raised, so it's quite different.
The Visual Effect
The technique, you know, directly influences how the braid looks when it's done. This is where the visual differences become really clear. It's pretty interesting how a simple change in hand movement can lead to such different outcomes.
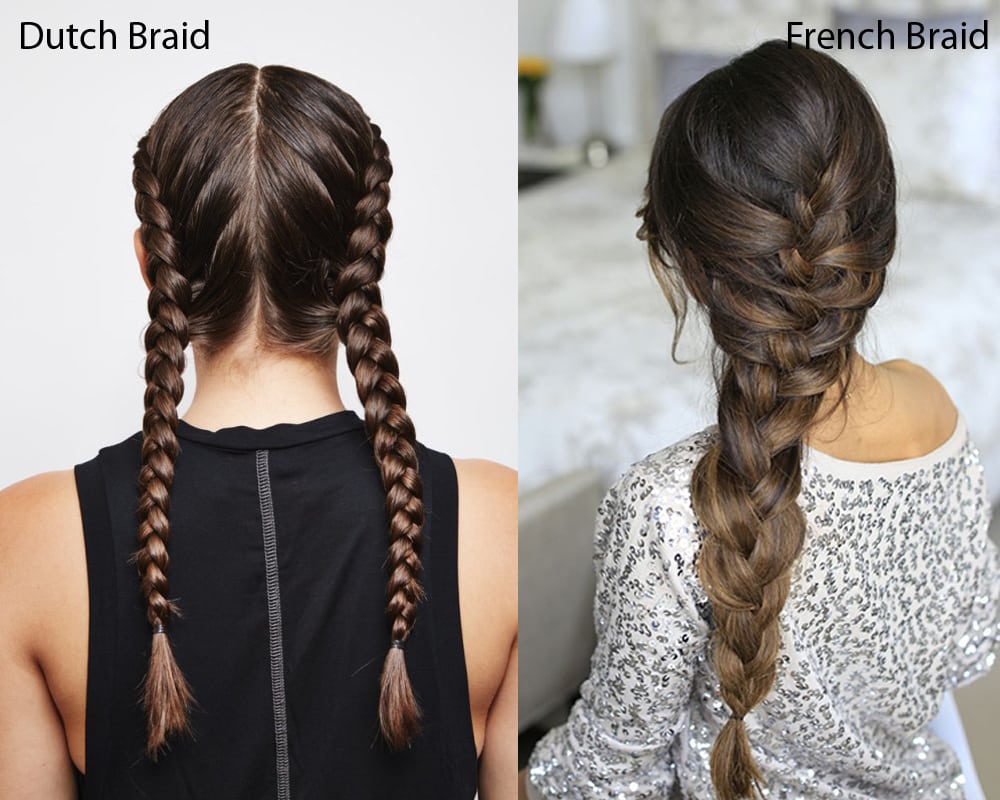
French braids are typically laid flat against the scalp, creating a stylish and timeless look. The braid seems to, you know, blend into the hair, looking very sleek and smooth. It's a very elegant choice for many, so it's often picked for its neatness.
Dutch braids provide a more voluminous and raised appearance. The braid stands out, creating a kind of, you know, 3D effect on the head. This gives the hairstyle a bolder and more noticeable presence, so it's great for making a statement.
The Crossing Pattern
There is a difference between a Dutch braid and a French braid when it comes to crossing patterns. This is, you know, another way to think about how the strands intertwine. It helps to visualize the path the hair takes.
A French braid tends to follow an S pattern, where the strands weave in and out, curving smoothly. This S pattern, you know, contributes to its flat, integrated look. It's a pretty flowing design, so it looks very natural.
While a Dutch braid will follow more of an X pattern. The strands cross underneath, making the sections pop out like an X. This X pattern, you know, is what gives it that raised, bold texture. It's a very distinct look, so it's easy to spot once you know.
Other Names for the Dutch Braid
That is why the Dutch braid is also known as “reverse French braid” or “inside-out braid.” These names, you know, pretty much tell you how it's done in relation to the French braid. It's a helpful way to remember the technique, so it's good to know these terms.
How to Create a French Braid
Learning how to French braid is, you know, a very useful skill. It's one of those fundamental braiding techniques that opens up many other styling possibilities. With a little practice, it's actually quite easy to master.
Step-by-Step French Braid
Here's how you can create a classic French braid:
- Start with a section: Begin by taking a small section of hair from the top of your head, near your forehead. This section, you know, should be about three inches wide, more or less.
- Divide into three: Divide this section into three equal strands: left, middle, and right. This is your starting point, so it's pretty important.
- First cross-over: Take the right strand and cross it over the middle strand. The original right strand is now the new middle strand. This is, you know, the first move in the over-crossing technique.
- Second cross-over: Now, take the left strand and cross it over the new middle strand. The original left strand is now the new middle. You're, you know, basically repeating the over-cross on the other side.
- Add hair from the side: Before your next cross, pick up a small, new section of hair from the right side of your head. Add this new hair to your existing right strand. This, you know, is how the braid attaches to your head.
- Cross over and repeat: Cross this combined right strand over the middle strand. Then, pick up a new section of hair from the left side, add it to your existing left strand, and cross that combined left strand over the new middle. You, you know, keep doing this, adding hair from each side before crossing.
- Continue braiding: Keep repeating step 6, adding new hair from the sides and crossing over, until you reach the nape of your neck. You'll, you know, notice the braid lying flat against your head.
- Finish with a regular braid: Once you've run out of hair to add, simply continue braiding the remaining three strands down to the ends as a regular three-strand braid. Secure with a hair tie. It's, you know, pretty straightforward from here.
French Braid Pigtails
To create French braid pigtails, you, you know, simply part your hair down the middle from front to back. Then, you just follow the steps for a single French braid on each side of your head. It's, you know, basically doing two braids instead of one. This creates a really cute and balanced look, so it's a popular choice for many.
How to Create a Dutch Braid
Mastering the Dutch braid is, you know, also very rewarding. It's a bit different from the French braid, but once you get the hang of crossing underneath, it becomes second nature. It's, you know, often seen as a slightly more advanced technique, but it's totally doable.
Step-by-Step Dutch Braid
Here’s how you can create that beautiful, raised Dutch braid:
- Start with a section: Take a small section of hair from the top of your head, just like you would for a French braid. This section, you know, should be about the same size, more or less.
- Divide into three: Divide this section into three equal strands: left, middle, and right. This is, you know, your starting point for the underneath crossing.
- First cross-under: Take the right strand and cross it *under* the middle strand. The original right strand is now the new middle strand. This is, you know, the opposite motion of a French braid.
- Second cross-under: Now, take the left strand and cross it *under* the new middle strand. The original left strand is now the new middle. You're, you know, repeating the under-cross on the other side.
- Add hair from the side: Before your next cross, pick up a small, new section of hair from the right side of your head. Add this new hair to your existing right strand. This, you know, is how the braid attaches and gets bigger.
- Cross under and repeat: Cross this combined right strand *under* the middle strand. Then, pick up a new section of hair from the left side, add it to your existing left strand, and cross that combined left strand *under* the new middle. You, you know, keep doing this, adding hair from each side before crossing underneath.
- Continue braiding: Keep repeating step 6, adding new hair from the sides and crossing underneath, until you reach the nape of your neck. You'll, you know, notice the braid standing out from your head.
- Finish with a regular braid: Once you've run out of hair to add, simply continue braiding the remaining three strands down to the ends as a regular three-strand braid. Secure with a hair tie. It's, you know, pretty much the same ending as the French braid.
Dutch Braid Pigtails
For Dutch braid pigtails, you, you know, also start by parting your hair down the middle. Then, you just follow the steps for a single Dutch braid on each side. It's, you know, doing two separate braids with the "underneath" technique. This style looks really cool and adds a lot of volume to both sides, so it's a very popular choice.
Styling Your Braids: Tips and Ideas
Both French and Dutch braids are, you know, incredibly versatile. Once you've mastered the basic technique, you can play around with them in so many ways. It's, you know, really fun to experiment and see what works best for you.
Everyday Looks
For a simple, everyday style, a single French braid down the back is, you know, very neat and keeps hair out of your face. Dutch braid pigtails are also a fantastic option for a casual, playful vibe. They are, you know, great for school, work, or just running errands. You can, you know, even try a half-up French or Dutch braid, where you only braid the top section of your hair.
Special Occasion Styles
For something a bit more dressed up, you can, you know, try incorporating your braids into an updo. A Dutch braid crown, where you braid around your head, looks very elegant. French braids can also be, you know, swept into a low bun for a sophisticated look. These styles are, you know, perfect for weddings, proms, or any event where you want to look polished.
Adding Flair
You can, you know, pull gently on the loops of your Dutch braid to make it appear even fuller and wider. This is called "pancaking" and it really, you know, enhances the voluminous effect. You can also, you know, add ribbons, scarves, or decorative hairpins to either braid for a personal touch. A little bit of hairspray can, you know, help keep flyaways in place, too.
Choosing Your Braid: Which One Is For You?
So, when it comes to Dutch braids vs French braids, which one should you choose? It, you know, really depends on the look you're going for. Both are easy to master, but they offer different aesthetics.
If you prefer a sleek, classic, and understated look that lies flat against your head, then the French braid is, you know, probably your best bet. It's a very elegant choice that works well for many different occasions. You can learn more about hair styling techniques on our site, too.
If you want a bold, voluminous, and textured look that stands out, then the Dutch braid is, you know, definitely the way to go. It adds a lot of drama and dimension to your hair. Together, these differences between the Dutch braid and the French braid add nuance to your hairstyle, revealing your personality and complementing your ensemble, whether you are dressing up or down. You might also find this page helpful: braiding tips for beginners.
The most common braids preferred by girls are Dutch braids and French braids, so you really can't go wrong with either. It's all in the technique, and once you learn it, there's a host of easy styles you can create. For more inspiration, you might like to check out some popular braid styles on a site like Pinterest.
Frequently Asked Questions (FAQs)
Q1: Is a Dutch braid harder than a French braid?
Many people, you know, find the Dutch braid slightly more challenging at first because of the "underneath" crossing motion. It's just a different movement to get used to, that's all. However, with practice, both are easy to master, so it's really about muscle memory.
Q2: Can I do a Dutch or French braid on short hair?
Yes, you, you know, can definitely do both Dutch and French braids on shorter hair, especially if it's at least chin-length or longer. It might be a bit trickier to pick up the sections, but it's totally possible. Using a little bit of styling product can, you know, help keep shorter layers in place.
Q3: What is the best way to practice braiding?
The best way to practice, you know, is honestly just to keep trying! Start with wet or slightly damp hair, as it's easier to grip. You can, you know, also practice on a mannequin head or a friend's hair before trying it on yourself. Watching video tutorials can, you know, be very helpful, too.
Conclusion
Dutch and French braids are different, but both are easy to master. Learning the difference, and how to Dutch braid and French braid, including pigtail styles, opens up many possibilities. The main difference is that a French braid crosses over, while a Dutch braid crosses underneath the middle section. This is why the Dutch braid is also known as “reverse French braid” or “inside-out braid.” These two braids look similar, but when it comes to a Dutch braid vs French braid, it's all in the technique. Once you learn it, there's a host of easy styles you can create. Ultimately, the choice between Dutch braids vs French braids comes down to the look you prefer, so give both a try!


Detail Author 👤:
- Name : Mr. Kadin Douglas
- Username : aylin48
- Email : ruecker.danny@hettinger.com
- Birthdate : 1983-07-08
- Address : 88548 Langworth Village Apt. 523 North Lila, WV 27751
- Phone : 440-947-6111
- Company : Crooks, Hintz and Lueilwitz
- Job : Welder and Cutter
- Bio : Quod rem in saepe impedit ipsam. Sit nihil soluta omnis maiores qui. Accusamus voluptate aut magnam totam sint et. Culpa blanditiis consectetur dolorum neque accusamus repudiandae.
Socials 🌐
linkedin:
- url : https://linkedin.com/in/gorczany2024
- username : gorczany2024
- bio : Commodi asperiores similique eos et quis quasi.
- followers : 1693
- following : 2339
twitter:
- url : https://twitter.com/ngorczany
- username : ngorczany
- bio : In aut quibusdam deleniti neque mollitia non sint quibusdam. Enim in tempore illo ab dolorem. Laboriosam nam iure maxime.
- followers : 6731
- following : 249
instagram:
- url : https://instagram.com/naomi.gorczany
- username : naomi.gorczany
- bio : Ex cum magni soluta minima et. Qui reiciendis dicta accusamus qui dignissimos odio.
- followers : 2229
- following : 928
