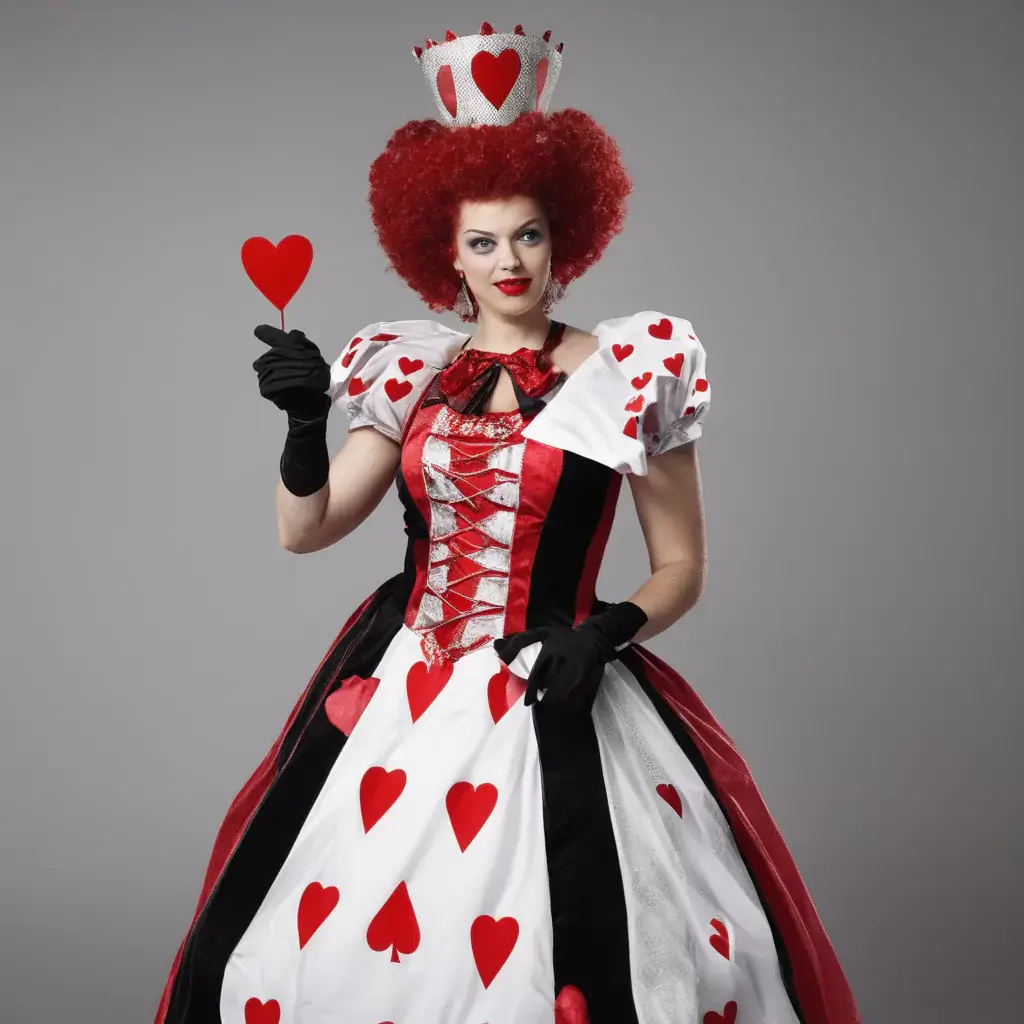
Craft Your Own Royal Look: The Ultimate Queen Of Hearts Costume DIY Guide
Are you dreaming of making a grand entrance at your next costume party or Halloween bash? Perhaps you're looking for a truly memorable outfit that stands out from the crowd. Well, creating your very own Queen of Hearts costume DIY project is that perfect way to bring a touch of Wonderland whimsy and regal flair to life. It’s a chance to show off your creative side, and honestly, it’s a lot of fun to put together, too.
This iconic character, with her bold colors and commanding presence, offers so many possibilities for personal expression. You can go for a classic storybook feel, or maybe you want something a bit more dramatic and modern. Either way, making your own costume lets you control every little detail, ensuring your look is truly one-of-a-kind, you know?
Forget those generic store-bought outfits that everyone else seems to have. With a bit of planning and some clever crafting, you can create a Queen of Hearts ensemble that will turn heads and quite frankly, make you feel like royalty. We'll walk you through everything you need to know, so you can easily put together a stunning outfit for any event.
- Cindy Lou Who Hairstyle
- How To Charge Your Phone Without A Charger
- Monkey Easy Drawing
- Quinnfinite Pool Table
- Symone Sanders With Hair
Table of Contents
- Why a DIY Queen of Hearts Costume is Just Right
- Getting Started: Your DIY Queen of Hearts Essentials
- Step-by-Step Guide to Crafting Your Look
- Tips for a Truly Unique Queen of Hearts Costume
- Frequently Asked Questions About Your Queen of Hearts Costume DIY
- Where to Find Your Supplies (and a Little Inspiration!)
- Your Royal Transformation Awaits!
Why a DIY Queen of Hearts Costume is Just Right
Choosing to make your own Queen of Hearts costume offers a bundle of benefits. For one thing, it often saves you money compared to buying a complete outfit from a store, which can be quite pricey, you know? You can reuse materials you already have or pick up affordable bits and pieces from craft stores and thrift shops, so that helps with the budget.
Another great thing is the sheer joy of creativity. There's something truly satisfying about bringing your own vision to life, isn't there? You can customize every single part of your costume, making it perfectly suited to your style and body shape. This means your Queen of Hearts will be completely unique, rather than looking like everyone else's, which is pretty cool.
Plus, the Queen of Hearts is a timeless character, and her costume always makes an impact. It's a classic choice for Halloween, themed parties, or even theatrical events. So, if you're looking for a costume that's both striking and personal, a DIY approach is very much the way to go.
- Whole Foods Vegan Cake
- Scary Hello Kitty
- How To Craft A Flower Pot In Minecraft
- Who Is The Richest Kid In The World
- Ixl Answer Key
Getting Started: Your DIY Queen of Hearts Essentials
Before you even pick up a pair of scissors, it's helpful to gather your thoughts and materials. Thinking about the main elements of the Queen of Hearts look will help you plan your project effectively. We're talking about the dress, the crown, maybe a scepter, and of course, those iconic playing card details, you see.
The Dress or Skirt: Building Your Royal Base
The foundation of your Queen of Hearts costume is almost always a dress or a skirt and top combo. You'll want something in shades of red, black, white, and perhaps a touch of gold. Here are some ideas for your base, which can be pretty simple to start with:
- Thrift Store Find: Look for a long red or black dress. A prom dress or a formal gown can be amazing starting points. You might find one with a full skirt, which is just perfect for that regal look.
- Basic Skirt and Top: A plain black or red skirt, paired with a white blouse, can be easily transformed. You can add ruffles, lace, or card cutouts to these simple pieces, actually.
- No-Sew Fabric Wrap: For a super easy option, use large pieces of red or black fabric. You can wrap them around yourself to create a simple skirt or even a basic dress shape, securing them with pins or fabric glue. This is surprisingly effective, too.
- Old Curtains or Sheets: If you have old red velvet curtains or white sheets lying around, they can be repurposed into costume fabric. Just make sure they are clean and suitable for wear.
Think about the overall silhouette you want. A full, dramatic skirt really captures the Queen's commanding presence, but a more streamlined look can also be quite striking, you know?
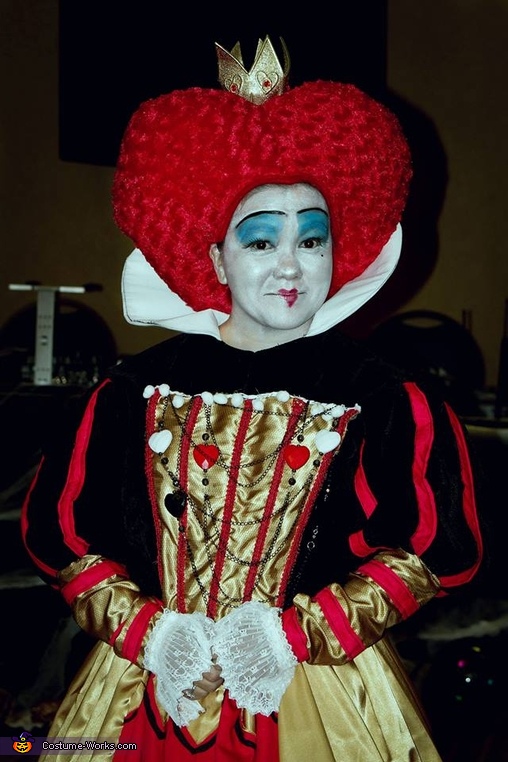
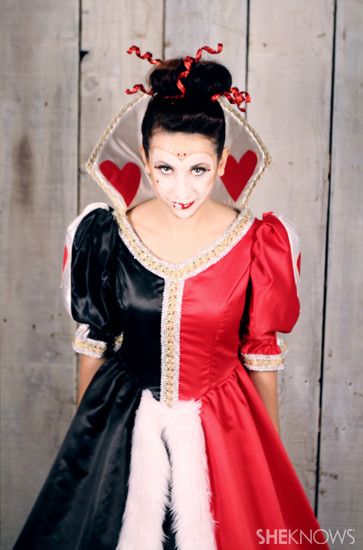
Crown and Scepter: Symbols of Sovereignty
No Queen of Hearts is complete without her symbols of power. A crown and a scepter are pretty much non-negotiable for this costume. Luckily, these are often very easy to make yourself, which is great for a DIY project.
- Cardboard Crown: Cut a crown shape from sturdy cardboard. Paint it gold or red, and then glue on playing card cutouts or heart shapes. You can add glitter or fake jewels for extra sparkle, too.
- Plastic Headband Base: Attach felt hearts, card cutouts, or even small plastic playing cards directly onto a plain headband. This makes for a comfortable and easy-to-wear crown, arguably.
- Foam Sheet Crown: Craft foam is flexible and easy to cut. You can create intricate designs and glue them together. It holds its shape well, which is a nice bonus.
- DIY Scepter: Use a wooden dowel, a sturdy stick, or even a wrapped cardboard tube as the base. Attach a large heart shape, a playing card, or a decorative ball to the top. Paint it to match your crown, of course.
- Embellishments for Scepter: Wrap the scepter with ribbon, add some gold trim, or glue on more hearts. The more dramatic, the better, really.
These accessories truly elevate your costume from a simple outfit to a full royal ensemble, you see.
Makeup and Hair: The Finishing Touches
Your face and hair are key to completing the Queen of Hearts transformation. Her look is quite distinctive, with bold makeup and often an elaborate hairstyle. You can definitely achieve this with everyday items, so don't worry.
- Dramatic Eyes: Think bold eyeliner, perhaps a winged look, and lots of mascara. You could even try drawing a small heart under one eye with red eyeliner or face paint, which is a fun touch.
- Red Lips: A strong, vibrant red lipstick is essential. The Queen of Hearts is known for her striking pout, after all.
- Pale Base: A slightly paler foundation than your usual shade can give you that classic storybook look, but this isn't strictly necessary.
- Heart Cheeks: Some people like to draw small, neat hearts on their cheeks with face paint or eyeliner. This is a very recognizable detail, you know.
- Hair: A high bun, a teased updo, or even simply curled hair can work. You can spray paint sections red or black temporarily if you want a bolder look, or add clip-in extensions.
- Wig Option: If you want a truly dramatic hair transformation, a black, red, or even a black and white wig can be a great choice. You can find these quite affordably online or at costume shops, too.
These details make a huge difference in bringing the character to life, actually.
Playing Card Accents: Hearts Everywhere!
The playing card motif is perhaps the most recognizable element of the Queen of Hearts. Integrating hearts, spades, clubs, and diamonds, especially hearts, into your costume is a must. This is where you can get really creative, you know?
- Cut-out Hearts: Cut various sizes of hearts from red, black, or white felt, cardstock, or even old playing cards. Glue or sew these onto your dress, skirt, or even shoes.
- Painted Details: Use fabric paint to draw playing card symbols directly onto your costume pieces. This can be very effective on a plain white or black base.
- Collar and Cuffs: Create an oversized white collar and cuffs from felt or stiff fabric. Decorate these with black and red hearts or card symbols. This adds a very regal touch, you see.
- Fan of Cards: Glue several playing cards together in a fan shape and attach them to your dress or use them as a handheld prop. This is a simple but clever addition, arguably.
- Shoulder Epaulets: Craft small shoulder pieces from cardboard or foam, decorate them with hearts, and attach them to your dress. This gives a very military-esque, commanding look, which is quite fitting.
These accents are what truly make your costume scream "Queen of Hearts," so make sure to include plenty of them.
Step-by-Step Guide to Crafting Your Look
Now that you have an idea of the essential elements, let's break down how to put it all together. You can mix and match these methods depending on your skill level and how much time you have, you know?
The No-Sew Wonder: Quick and Clever
This method is perfect if you're short on time or don't own a sewing machine. It relies on fabric glue, safety pins, and clever draping. It's surprisingly effective, too.
- Choose Your Base: Start with a plain red or black dress, or a long skirt and white top. A thrift store find is often ideal for this, actually.
- Create the Collar: Cut a large, stiff white felt or cardstock circle. Cut out the center to fit around your neck. Decorate the outer edge with large black or red hearts. Attach it to your dress with fabric glue or safety pins, which is quite simple.
- Add Card Details: Cut out many heart shapes from red and black felt or cardstock. Arrange them artistically on your dress or skirt. Use fabric glue to secure them firmly. You can also glue actual playing cards onto the fabric, if you like your look to be very literal.
- Make Cuffs: Cut strips of white felt for cuffs. Decorate them with smaller hearts. Attach them to the sleeves of your top with fabric glue or by wrapping them around and securing with pins.
- Assemble Crown and Scepter: Follow the instructions in the "Crafting Your Regal Headpiece" section below. These are typically no-sew items anyway, so that works out well.
- Final Touches: Put on your bold makeup and style your hair. Add any other accessories like a fan or heart-shaped earrings.
This approach allows for a very quick transformation, so you can be ready for your event in no time.
Simple Sewing for a Custom Fit
If you have basic sewing skills, you can create a more tailored and durable costume. This often involves modifying existing garments or sewing simple shapes. It's not as hard as it sounds, truly.
- Select Your Fabric: Red, black, and white cotton, satin, or even velvet can work beautifully. Consider how much fabric you'll need for a full skirt or a simple dress.
- Modify a Pattern or Existing Dress: Find a simple dress pattern, perhaps an A-line or a full-skirted design. Alternatively, take an old dress and add panels of contrasting colors. For example, sew black and white panels onto a red dress.
- Sew the Collar and Cuffs: Cut your white fabric for an oversized collar and cuffs. Hem the edges and then sew on red or black heart appliques. Attach the collar to the neckline of your dress and the cuffs to the sleeves.
- Create a Peplum or Overskirt: Sew a gathered peplum in a contrasting color (like black or white) to the waistline of your red dress. This adds volume and a classic silhouette, which is quite nice.
- Add Card Embellishments: Cut out fabric hearts or playing card shapes. Use a sewing machine or hand-stitch them onto your dress. This provides a more secure attachment than glue, you know.
- Assemble Accessories: Craft your crown and scepter, perhaps using more durable materials like thicker felt or even lightweight plastic, if you're feeling ambitious.
Even a little bit of sewing can make your costume feel much more polished and professional, which is a great feeling.
Crafting Your Regal Headpiece
Your crown is a focal point, so make it shine! Here's a detailed way to create a sturdy and eye-catching crown, which is actually quite fun to do.
- Gather Materials: You'll need sturdy cardboard (like from a cereal box), gold or red spray paint, a hot glue gun, scissors, and decorations like playing cards, felt hearts, or plastic jewels.
- Measure and Cut: Measure the circumference of your head. Cut a long strip of cardboard that is this length plus an inch or two for overlap. Decide on the height of your crown (perhaps 4-6 inches) and draw jagged points or rounded peaks along one long edge. Cut out the shape.
- Form the Circle: Bring the ends of the cardboard strip together and overlap them. Use hot glue or strong tape to secure the circle shape. Make sure it fits comfortably on your head, but not too loosely.
- Paint Your Crown: In a well-ventilated area, spray paint your cardboard crown gold or red. Let it dry completely. You might need a second coat for full coverage, you know.
- Decorate with Hearts and Cards: Cut out many heart shapes from red or black felt, or use actual playing cards. Glue these all over your crown, especially on the peaks. You can also add plastic jewels, glitter glue, or gold trim for extra sparkle, which really makes it pop.
- Attach to Headband (Optional): For extra stability, hot glue your finished cardboard crown to a plain plastic headband. This helps it stay in place throughout your event, which is quite practical.
This method ensures your crown looks impressive and stays put, so you can rule your party with confidence.
Tips for a Truly Unique Queen of Hearts Costume
While the classic Queen of Hearts look is wonderful, there are many ways to put your own spin on it. Adding unique touches makes your costume even more special, you know?
- Asymmetrical Design: Instead of perfectly balanced hearts, try an asymmetrical pattern. Maybe one side of your skirt has a cascade of cards, while the other is more simple. This adds a bit of modern flair, arguably.
- Texture Play: Mix different fabrics like velvet, satin, and lace. A red velvet skirt with a black lace overlay can look incredibly rich and regal.
- Hand-Painted Details: If you're artistic, hand-paint intricate playing card designs or whimsical Alice in Wonderland elements onto your dress. This is a very personal touch, too.
- Gloves and Tights: White or black gloves, perhaps with a heart sewn onto them, can add elegance. Striped tights (red and white, or black and white) can also enhance the Wonderland vibe, which is quite fun.
- Oversized Props: Consider carrying an oversized teacup, a flamingo croquet mallet, or even a tiny white rabbit plushie as a prop. These subtle additions connect your costume more deeply to the story, you see.
- Dramatic Collar: Make your collar extra large and stiff. You can use wire inside the edges to make it stand up dramatically, which is quite a statement.
- Footwear: Red or black heels, flats, or even boots can work. You can decorate them with small hearts or playing card symbols, too, for a cohesive look.
- Lighting: For evening events, consider adding tiny battery-operated LED lights to your crown or dress. This can create a magical glow, which is pretty cool.
Remember, the best DIY costumes are those that reflect your own personality and creativity, so feel free to experiment.
Frequently Asked Questions About Your Queen of Hearts Costume DIY
How do you make a Queen of Hearts costume without sewing?
Making a no-sew Queen of Hearts costume is very much possible! You can start with a plain red or black dress, or a combination of a skirt and top. Then, use fabric glue or a hot glue gun to attach all your decorative elements. Cut out heart shapes from felt, cardstock, or old playing cards, and simply glue them onto your chosen garments. For a collar, use stiff felt or cardboard, decorating it with hearts, and secure it with fabric glue or safety pins. Crowns are also easily made from cardboard and glue, which is quite convenient.
What materials do I need for a DIY Queen of Hearts costume?
For a DIY Queen of Hearts costume, you'll want to gather a few key materials. These typically include fabric in red, black, and white (like felt, cotton, or satin), sturdy cardboard for your crown and scepter, and a hot glue gun with plenty of glue sticks. You'll also need scissors, perhaps some spray paint in gold or red, and decorative items like playing cards, plastic jewels, or glitter. Don't forget makeup in bold red and black, and maybe some temporary hair color if you want to go all out, too.
Can I use household items for a Queen of Hearts costume?
Absolutely, you can use many household items for your Queen of Hearts costume! Old red or black sheets, curtains, or even large t-shirts can serve as the base fabric for your dress or skirt. Cereal boxes or other cardboard packaging are perfect for crafting your crown and scepter. You can use old playing cards for decorations, and even red construction paper for cutting out heart shapes. Empty paper towel rolls can become the base for your scepter. Creativity with what you have around the house can save you a lot of money, which is pretty great.
Where to Find Your Supplies (and a Little Inspiration!)
Finding the right materials for your DIY Queen of Hearts costume doesn't have to be a treasure hunt. Craft stores are, of course, a fantastic resource for fabric, felt, glue, and all sorts of embellishments. Places like discount stores often have surprisingly good finds for costume bits and pieces, you know?
Don't forget to check out thrift stores for the base garments. You might find a beautiful dress or skirt that just needs a little embellishment. Online marketplaces can also be great for specific items like wigs or unique trims, too. For more general crafting ideas and techniques, you might find inspiration on sites like Pinterest for DIY costumes, which is a really good place to look for visual ideas.
You can learn more about costume ideas on our site, and also find great tips on making your own accessories by visiting this page here.
Your Royal Transformation Awaits!
Crafting your own Queen of Hearts costume DIY project is a rewarding experience. You get to express your creativity, save some money, and create a truly unique look that will definitely get noticed. From the bold red dress to the striking crown and playing card details, every element comes together to form a powerful and memorable character. So, gather your materials, let your imagination take hold, and get ready to rule your next event with a costume that's uniquely yours. It's almost time to show
Detail Author 👤:
- Name : Avis Corkery
- Username : kailee.pfeffer
- Email : lsipes@gmail.com
- Birthdate : 1984-07-30
- Address : 55849 Marisa Bypass Apt. 837 Port Dorothea, IA 31689
- Phone : +1-319-454-0347
- Company : Koelpin, Langosh and Pollich
- Job : Municipal Fire Fighter
- Bio : Error vitae iusto eos et. Sit maxime sed et nulla culpa perferendis. Qui aut qui odio consectetur quibusdam dignissimos. Debitis quo praesentium corrupti nesciunt quia et.
Socials 🌐
instagram:
- url : https://instagram.com/hilario.terry
- username : hilario.terry
- bio : Quidem inventore velit ea in voluptas. Nulla quo est enim.
- followers : 3886
- following : 98
tiktok:
- url : https://tiktok.com/@hilario_terry
- username : hilario_terry
- bio : Ut voluptate inventore facilis fugit et consequatur exercitationem.
- followers : 5299
- following : 1630
twitter:
- url : https://twitter.com/hilario.terry
- username : hilario.terry
- bio : Repellendus mollitia voluptas maxime rerum officia voluptatem velit. Quis optio eum est explicabo. Fuga harum sed est doloribus laborum.
- followers : 6039
- following : 1036
linkedin:
- url : https://linkedin.com/in/terryh
- username : terryh
- bio : Asperiores laborum non nostrum cupiditate ut.
- followers : 1687
- following : 1810
